| CHANGING THE TRANSMITTER FREQUENCY ON A
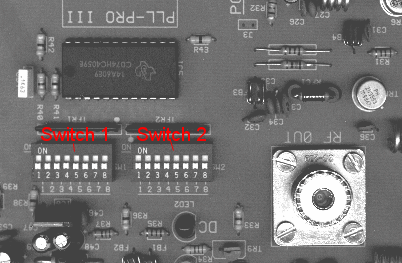
100/150W TRANSMITTER. �read in full before doing anything else. Prior to any work being done, run the unit for 30 minutes and check the temperature of the power amplifier. This gives you an idea of the correct running temperature. Also check the power output in watts and aim to get the same power when you have used the frequency changing procedure below. This operation must be done as two separate procedures. The first is to reset the frequency of the PLL-PRO III drive board and the second is to retune the 150-watt amplifier for maximum power and efficiency at the new frequency. Reset the PLL-PRO III drive: Fit the supplied jumper at position J2 (OLPD) to override the out-of-lock power down circuit. Remove the Amplifier INPUT from the cable at the 1W transmitter, and fit the small dummy-load. Select the code for the DIL switches from the look-up table and set the switches accordingly. Now switch on the power and adjust VC1 to get a locked condition.
Switch off for thirty seconds and
then
re-power. Check that the lock up time is around 5 seconds (this
indicates the pll is locked in the centre of the range). Once locked,
the most accurate way to
get the pll in the centre of the locking range is to very carefully
adjust VC1
for a reading of 3.2 volts at TR1/R4 junction. You can alternatively
fine-tune
the VCO by opening or compressing slightly, one the coils that form L1.
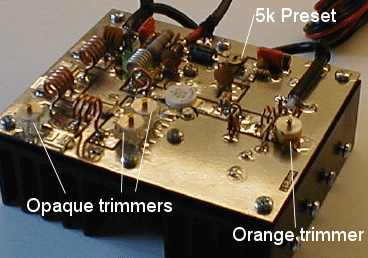
The Power Gain of the Amplifier (5k ohm pre-set) can be adjusted to increase, or
reduce, the power output, (do not set this at max, it could damage transistor). The normal output is usual set to about 115/160 watts
out. If the Aerial is not a very good match, power will be lower. You could
reduce the power out-put to allow a poor aerial to continue running, but try to
make sure that the aerial is an accurate SWR.
|